
[Next.js] 공부내용 정리
Next.js vs React.js
- React는 JS Library였지만 NextJS는 Framework다. 통제의 주체가 프로그래머가 아닌 nextjs 쪽에 있다. react는 library로서 자유도가 높았지만, nextjs는 framework로서 정해진 rule에 따라 코드를 짜줘야 한다.
- React는 SPA 제작에 최적화되어 있고, Client Side Rendering만 가능했다. 그러나 Full-stack framework인 NextJS에서는 Server Side Rendering이 가능하다.
Static pre-rendering
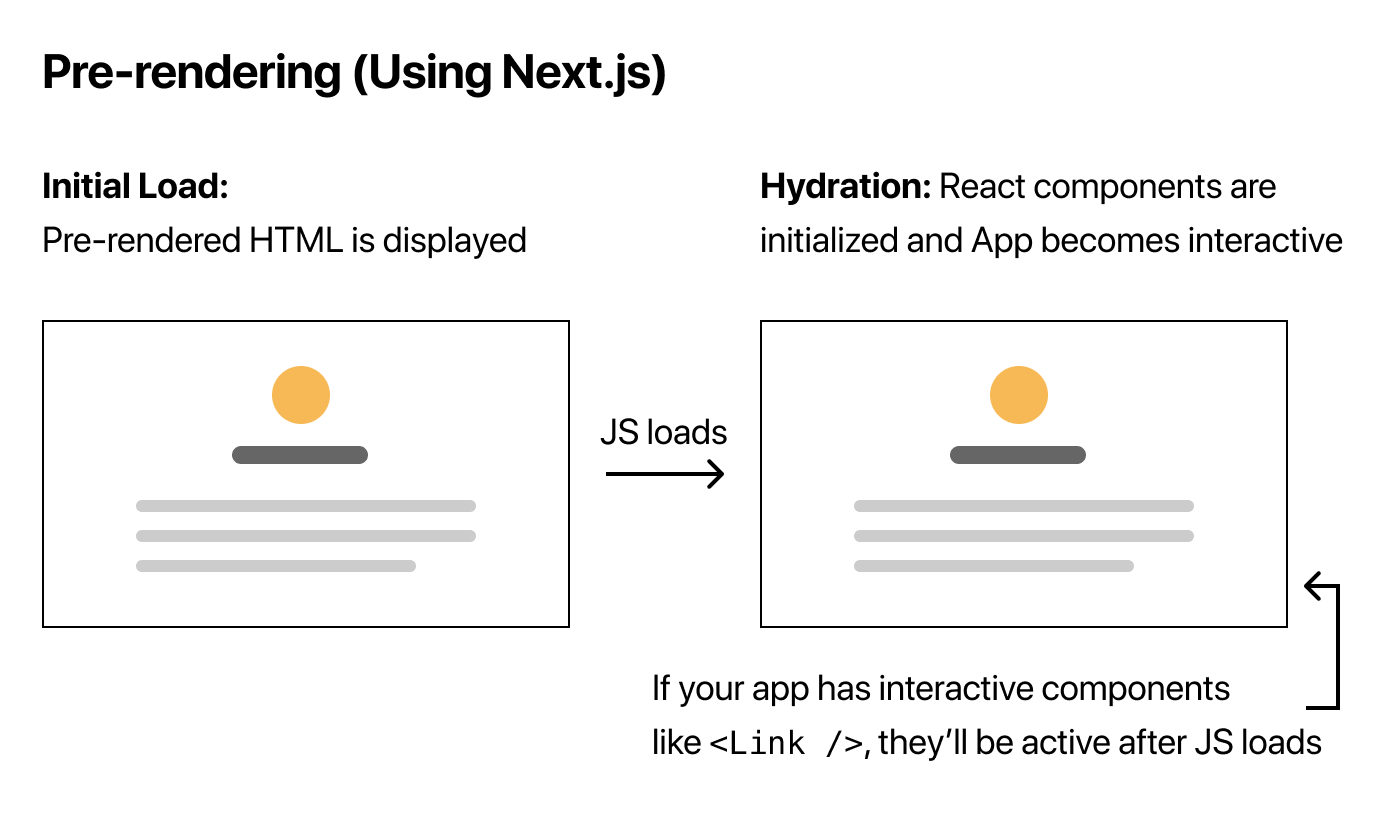

Next.js의 backend 단에서 HTML UI를 미리 만들어서 보여주고, JS가 로딩되면 이를 이용해서 interactive하게 만드는(이 과정을 hydration이라 부른다) 방식
- React는 JS가 로딩된 뒤에야 react component가 초기화되고 render되어 UI가 보인다.
- nextjs는 js가 아직 로딩되지 않아도 html이 페이지 코드 내에 박혀있지만 plain react는 오로지 root div만 존재한다. 이 경우 js가 로딩되어야 내부 요소가 채워진다.
Render
- navigation bar에 anchor(
<a>)를 쓰면 페이지가 통으로 새로고침 된다. 이러면 느려진다. - 대신 next/link의
<Link>를 써야 client side navigation을 활용하여 개선할 수 있다.
// <a> 사용 (전체 새로고침)
<nav>
	<a href="/">home</a>
</nav>
// <Link> 사용 (client side nav 활용)
import Link from "next/Link";

<nav>
	<Link href="/">
		<a>Home</a>
	</Link>
</nav>
CSS
-
Module CSS
// a.module.css .nav { background-color: tomato; } // a.js import styles from "./a.module.css"; <nav className={styles.nav}>...</nav>.module.css확장자를 가진 css 파일을 각 page, component 등마다 만들어서 적용- 일반 CSS 파일과 동일하게 작동하나, selector를 class만 활용한다.
className={styles.~~~}와 같이 js 파일에 className을 지정해주면 rendering 과정에서 고유한 이름이 만들어진다. → class name collision 걱정 안 해도 되고, 관리하기 편함 - 다만 매 파일마다
import styles from './~~~.module.css식으로 import를 해줘야 해서 번거로운 점이 있다.
- 일반 CSS 파일과 동일하게 작동하나, selector를 class만 활용한다.
-
styled-JSX
  <style jsx>{`
  	nav {
  		background-color: tomato;
  	}
  `}</style>
component의 fragment 내에 태그 안에 위와 같이 css를 적어준다. 그러면 module CSS처럼 고유한 class name을 자동 생성하여 이를 기반으로 style을 적용한다.
- 다만 component별로 한정되어 적용되므로 하위 component에 style이 상속 적용되진 않는다. 이를 원한다면
<style jsx global>과 같이global을 props에 넣어주면 된다.
- 다만 component별로 한정되어 적용되므로 하위 component에 style이 상속 적용되진 않는다. 이를 원한다면
_app.js
주로 전역 설정, layout을 다루는 component
- page component 호출 시
_app.js의 component(여기선App)가 먼저 호출된다. 호출된 page와 이에 대한 props(Server Side Props)는 각각Component,pageProps라는 props로 전달된다. 즉, 임의의 페이지는_app.js를 거쳐 rendering 된다. - global style도 정의 가능하다. 일반 page들에서는
.module.css형태 말고 일반 CSS 파일은 import가 불가능하다. 그러나_app.js에서는 가능하다. - 예) 호출 page를
<div>로만 감싸주는 코드
export default function App({Component, pageProps}){
	return (
		<div>
			<Component {...pageProps} />
		</div>
	);
}
Pattern
-
Layout pattern
export default function App({Component, pageProps}){ return ( <Layout> <Component {...pageProps} /> </Layout> ); } // Layout.js export default function Layout({children}) { return ( <> <NavBar /> <div>{children}</div> </> ) }- 전역 Layout 설정 시 사용
_app.js에서 Layout 관련 설정 분리해서 관리 →_app.js경량화 및 책임 분리
-
SEO Component with
<Head>Component
// Seo.js
export default function Seo({ title }) {
	return <Head>
		<title>{title} | 식샤</title>
	</Head>
}

// index.js
export default function Home() {
	return (
		<div>
			<Seo title="Home" />
			<h1>Home</h1>
		</div>
	);
}

// about.js
export default function About() {
	return (
		<div>
			<Seo title="About" />
			<h1>About</h1>
		</div>
	);
}
<Head>에 들어갈 공통 양식을 별도의 component로 빼서 재사용
Image Import
publicdir에 있는 파일은<img src="/~~.ico" />처럼 root 경로에서 갖다 쓰면 된다.
Redirect
// next.config.mjs
/** @type {import('next').NextConfig} */
const nextConfig = {
    async redirects() {
        return [
            {
                source: {redirect source url},
                destination: {redirect destination url},
                permanent: {whether redirection is permanent, true/false},
            },
        ];
    },
};

export default nextConfig;
/blog/:id와 같은 방식으로 url param을 받을 수 있고/blog/*와 같이 wildcard를 이용해 sub url 전체를 받을 수 있다
Rewrite
redirect와 비슷하나, 브라우저에서 url이 바뀌진 않는다
// next.config.mjs
/** @type {import('next').NextConfig} */
const nextConfig = {
    async rewrites() {
      return [{
        source: "/api/movies",
        destination: `https://api.themoviedb.org/3/movie/popular?api_key=${API_KEY}`,
      }];
    },
};

export default nextConfig;
- 위처럼 api key가 들어있는 url을 masking하는 용도로 쓸 수 있다.
Server Side Rendering
아래와 같이 getServerSideProps()라는 함수를 이용해 nextjs의 server에서 component로 보낼 props를 설정할 수 있다. (함수명 그대로 적어야 함. async일 필요는 X)
- 즉, server 단에서 필요한 작업(API 호출, DB 데이터 가져오기 등등)을 한 뒤 그 결과를 props로서 component에 흡수시켜서(Hydration) render시킬 수 있다.
- 따라서 로딩 창 같은 거 필요없이 애초에 데이터가 다 불러와졌을 때 페이지를 render하도록 만들 수 있다.
- server 단에서 하는 작업을 지정하는 것이므로, url은 absolute url만 사용 가능하다. server는 client의 root url을 모른다.
<script id="__NEXT_DATA__" type="application/json">...</script>내부에pageProps에 대한 object가 들어있다.
export default function Home({ results }) { ... }

export async function getServerSideProps(){
    const { results } = await ( await axios.get('http://localhost:3000/api/movies')).data;
    return {
        props: {
            results,
        },
    };
}
- SSR 시키면 데이터가 다 불러와지기 전까지 render되지 않는다는 건 단점이다. 다만 SSR의 장점인 검색엔진 최적화 등도 고려해볼 필요가 있다.
router.push()
url의 query param을 이용하여 page 간 정보 전달을 할 때가 있다. 이때 router.push() 나 <Link>의 as parameter를 이용하면 url의 불필요한 부분을 masking해서 사용자에게 필요없는 정보를 보이지 않게 할 수 있다.
Leave a comment